How to use this workbook
- Watch the embedded video for each section, then work through the checklist here.
- Fill in your shop-specific info (phone, logo URL, hours, etc.) — it saves as you type.
- You can come back anytime. Everything is stored locally in your browser.
- Stuck? Email support or book a setup call from your client portal.
Launch Pad — First Connections
The Launch Pad is the quickest way to get the most important external accounts connected. Most shops don't need to connect every item — focus on the essentials below.
LeadConnector Mobile App
This is the mobile app you'll use on your phone for push notifications, texts, calls, and bookings on the go.
Google Business Profile
Connecting your GBP is what makes automated review requests possible. Do this one even if you skip everything else.
Facebook (optional)
Only connect Facebook if you want to see your Facebook DMs in the Conversations tab alongside calls and texts — or if you plan to run Facebook ads.
Payment Processor
Stripe is the easiest path and is available right from the Launch Pad. If you already use PayPal or Square, head to Payments›Integrations to connect instead.
Logo & Media Library
Your logo is the most important asset to upload — it's used in emails, review requests, invoices, and booking pages. Upload it once, grab the link, and you're done.
Custom Values — Your Business Info
Custom Values are how your business info gets injected into every automation, review request, email, and text message. Fill these out once, and you'll never have to update copy in multiple places.
Google Review Link
Your Google review link is what the automated review request texts send customers to. Grab it once and paste it into Custom Values, and every automation pulls from it from here on.
Staff & User Permissions
If multiple people will log into your account — managers, detailers, admins — you'll add each one as a staff member. This also lets you assign specific services to specific staff.
For each team member, you'll need
Calendars & Services
Your snapshot comes pre-loaded with industry calendars — auto detailing, ceramic coating, PPF, window tinting, and more. You'll edit each one to match your pricing, your staff, and how your shop actually operates.
For each service calendar
Service Variations
Variations handle pricing differences within a single service. Full-body PPF on a two-door coupe costs different than on a sedan — that's a variation, not two separate services.
Add-Ons
Add-ons can be global (available across all services) or specific to one service. Example: pet hair removal on interior detail.
Booking Page Settings
This is what your customers see when they land on your booking page.
Payment Settings
Service Settings & Notifications
Phone System & IVR
You'll buy a phone number through the Phone System so you can text and call customers directly inside the software. This number will also be the one you attach to your Google Business Profile.
IVR (Interactive Voice Response)
An IVR is a simple dial tree that answers your business number and asks callers to press 1 to reach you. This blocks auto-dialer spam bots — they don't press 1, so they drop off and never reach you.
Invoices & Payment Collection
Once your payment processor is connected (Section 1), you can create invoices directly from the Payments section. Use one-time invoices for standard jobs, recurring invoices for fleet accounts or monthly subscriptions.
Invoice types
Before you send your first real invoice
Your Website
Your snapshot includes pre-built website templates tailored to detailing and tinting. You can use one as-is, customize it, or build your own from scratch using the AI builder or blank canvas.
Three ways to build
Adding Your Booking Page to Your Site
You have two options for connecting your website to your booking calendar.
Option A: Link to the booking page
Option B: Embed the booking widget on your site
Connecting Your Domain
You can buy a domain directly inside GHL, transfer an existing domain in, or connect a domain that lives at another registrar (Namecheap, GoDaddy, etc.) while keeping DNS there.
Automations Overview
Your snapshot comes with automations already built and organized. The two you need to pay attention to are IVR (covered in Section 7) and Review Requests (a deep dive is coming in Section 15).
Review Requests — quick overview
Your snapshot has a review request workflow for each major service (auto detailing, ceramic coatings, PPF, window tint, etc.). Each one is triggered by:
The default wait time is 3 days after the booking before the review request sends. This matches industry-standard service completion timing for these verticals. Adjust if your shop runs longer or shorter jobs.
Other automations pre-built
Booking & Collecting Payment Manually
Most of your bookings will come in through the website, but you'll still need to know how to book a customer manually when they call or walk in.
Booking flow (desktop)
Collecting payment after booking
Booking flow (mobile / LeadConnector app)
Here's the same flow walked through on your phone, so you can book a customer right from the LeadConnector app while you're on the floor or out on a mobile job.
Google Business Profile Optimization
Your Google Business Profile is how customers find you when they search "window tint near me" or "auto detailing in [city]." Setting it up right is the most sustainable, lowest-cost lead source you have — and the system below collects reviews for you on autopilot.
Create Your Profile (Skip If You Have One)
If you don't have a Google Business Profile yet, search "set up a Google Business page" and follow the prompts. You'll need a physical address (even a home or warehouse address works) — Google prioritizes businesses with a real location.
Optimize Your Business Info
Once verified, the real work begins. This is where most shops leave money on the table.
Service Areas
You can list up to 20 service areas. Even if you're a shop (not mobile), still list nearby cities — Google will show you to more people searching in those areas.
Services
Categories are the umbrella — services are the specific offerings underneath. Add as many as you can think of.
Products (The Hidden SEO Win)
Even though you're a service business, add your services as products with links to specific pages on your website. This is one of the most overlooked SEO wins for local shops.
Connect Your Profile To LuxBay
This is what turns your GBP into an autopilot review machine. Once connected, every appointment booked or invoice paid triggers an automated review request.
How The Review System Works
Once your GBP is connected, here's what happens automatically — you don't have to do anything else:
Facebook & Instagram Ads Setup
Your snapshot includes pre-built Meta ad templates for detail, tint, PPF, and ceramic shops — already tested and proven to convert. Download the templates, upload them in Ads Manager, and let the system handle lead capture, coupon delivery, and booking from there.
Set Up Your Business Portfolio
Your Business Portfolio is where Meta houses your Facebook page, Instagram, ad account, and team access — all in one place.
Create Your Campaign
From the Ads Manager, you'll build a campaign that drives leads into instant forms — not boosted posts.
Configure The Ad Set
Build The Ad
Create The Instant Form
The form is what converts a scroll into a real lead with their info, vehicle details, and timeframe.
Create The Coupon Code
Before finishing the form, create the actual coupon code inside LuxBay so it can be redeemed at booking.
Finish The Form & Connect The Booking Page
Sync The Form To LuxBay
This is the most important step — without it, none of the automations will trigger when a lead comes in.
Launch & Monitor
A2P 10DLC Registration
U.S. carriers require every business that sends texts from a 10-digit local number to register through A2P 10DLC. It's how carriers verify your business is legitimate and not running spam from the number. Without it, your texts will get filtered or dropped — review requests, appointment reminders, and lead follow-ups won't reach customers. Approval can take anywhere from a few hours to a few weeks, so start it as soon as you've got your number.
Before You Begin
A few things to have ready before you click Start Registration:
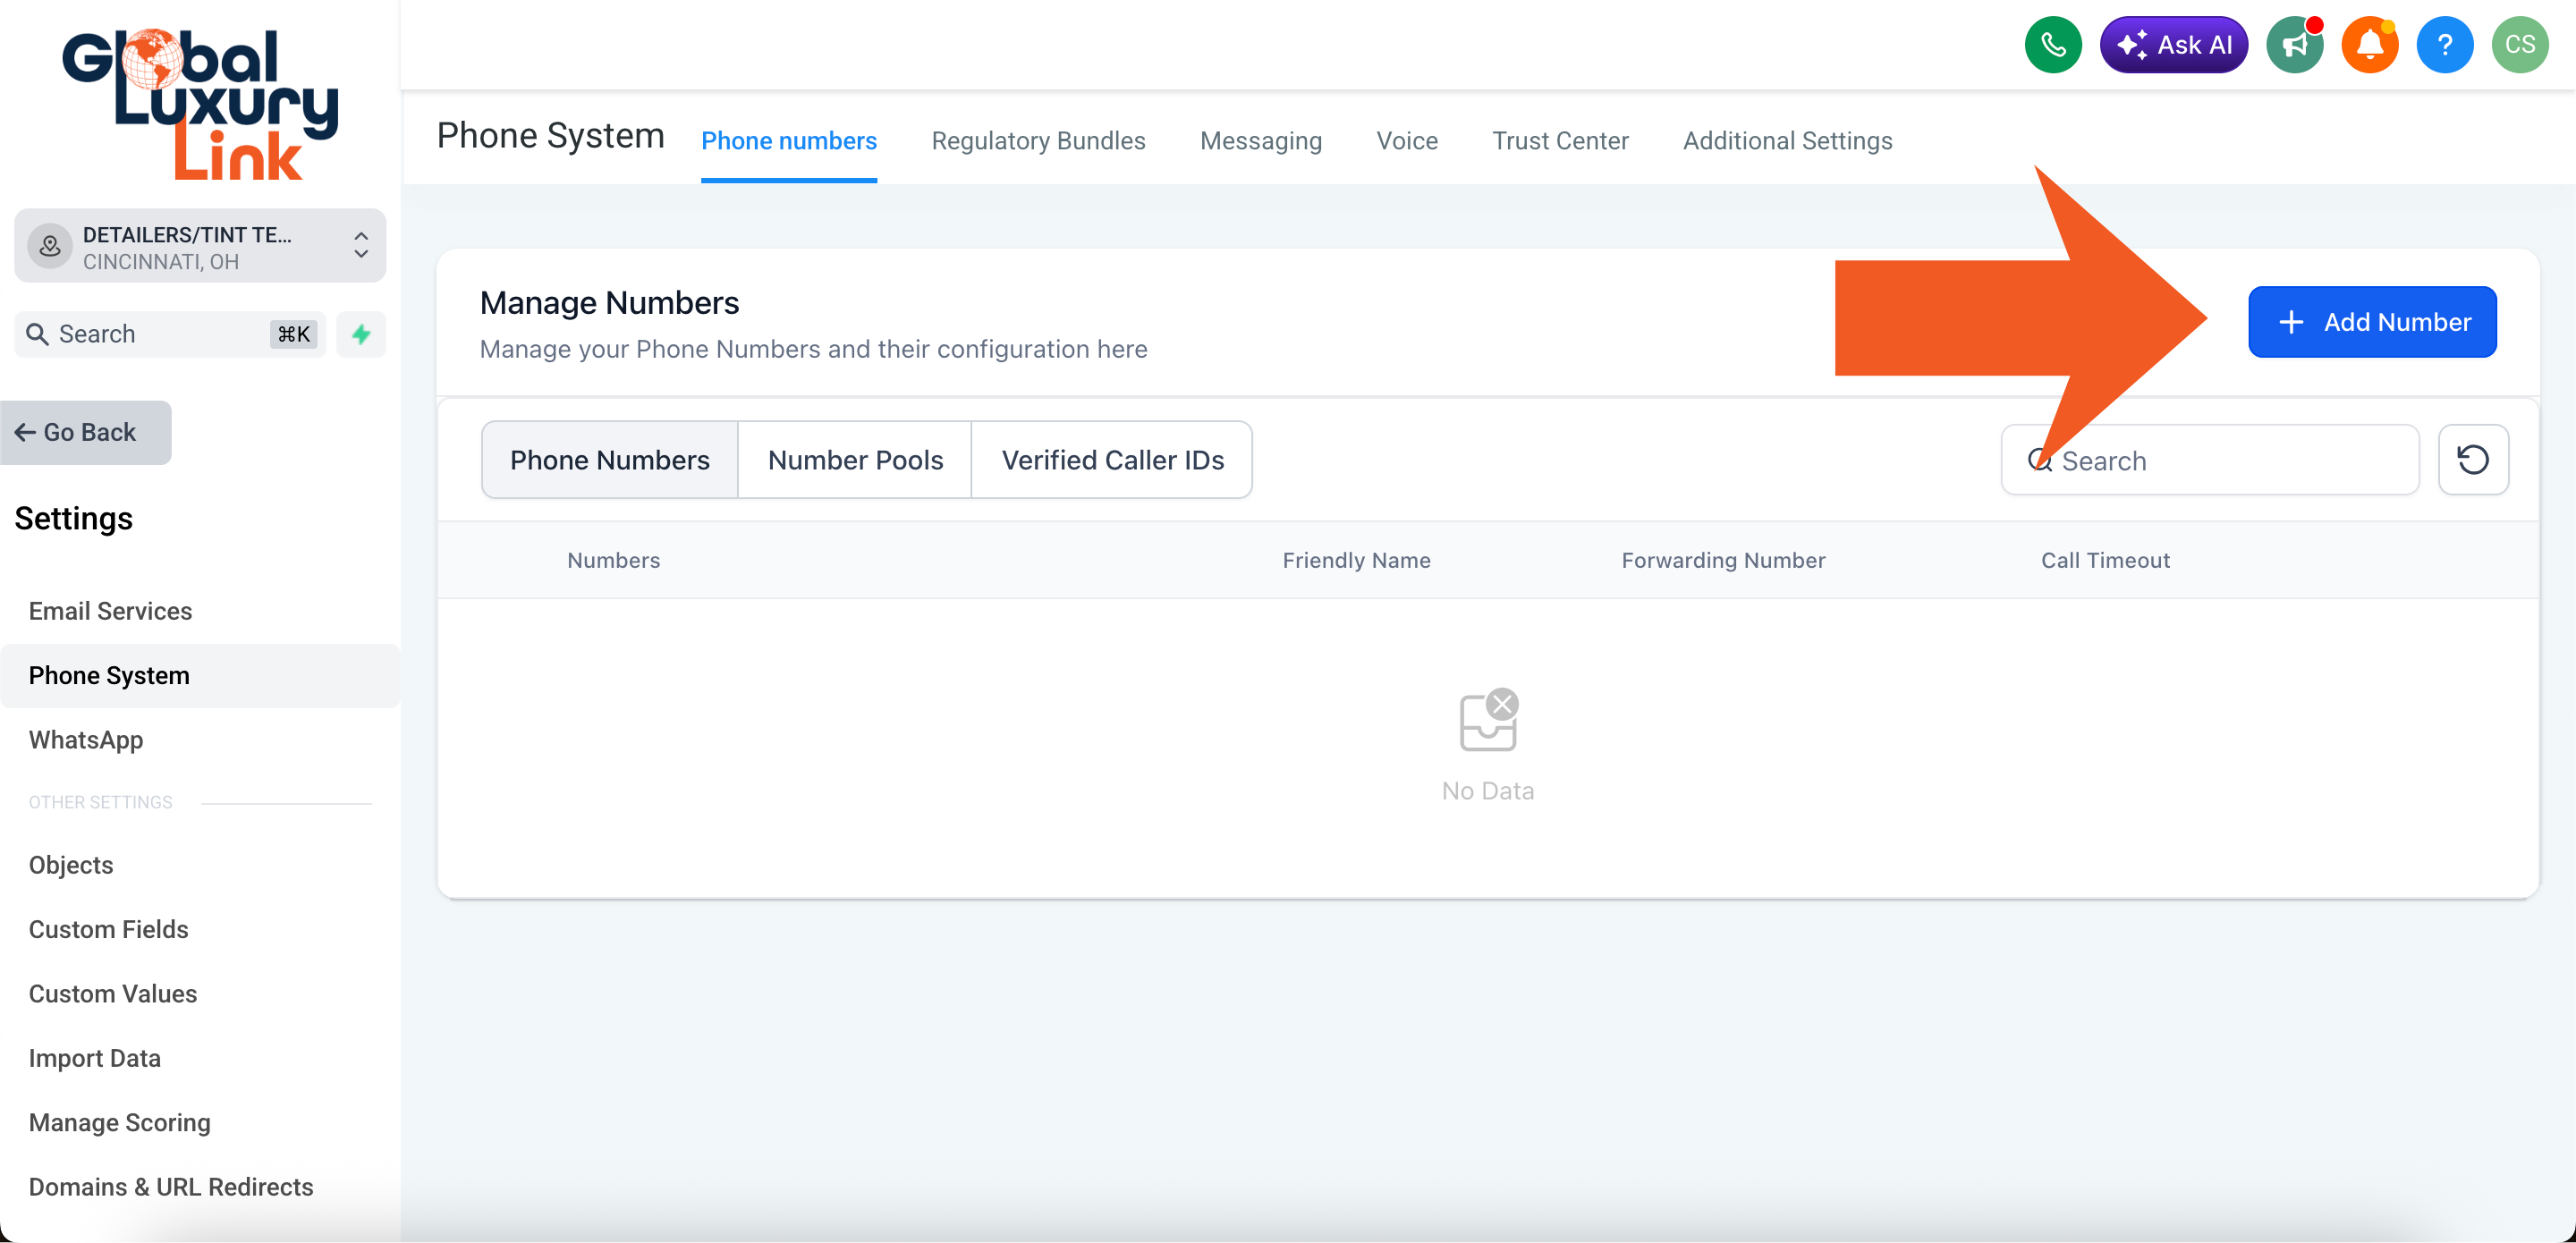
Step 1 — Buy Your Phone Number
If you haven't purchased your number yet, do that first.
Step 2 — Start Your A2P Registration
A2P registration lives under the Trust Center tab in the Phone System. This is the form carriers review to verify your business isn't using the number for spam.
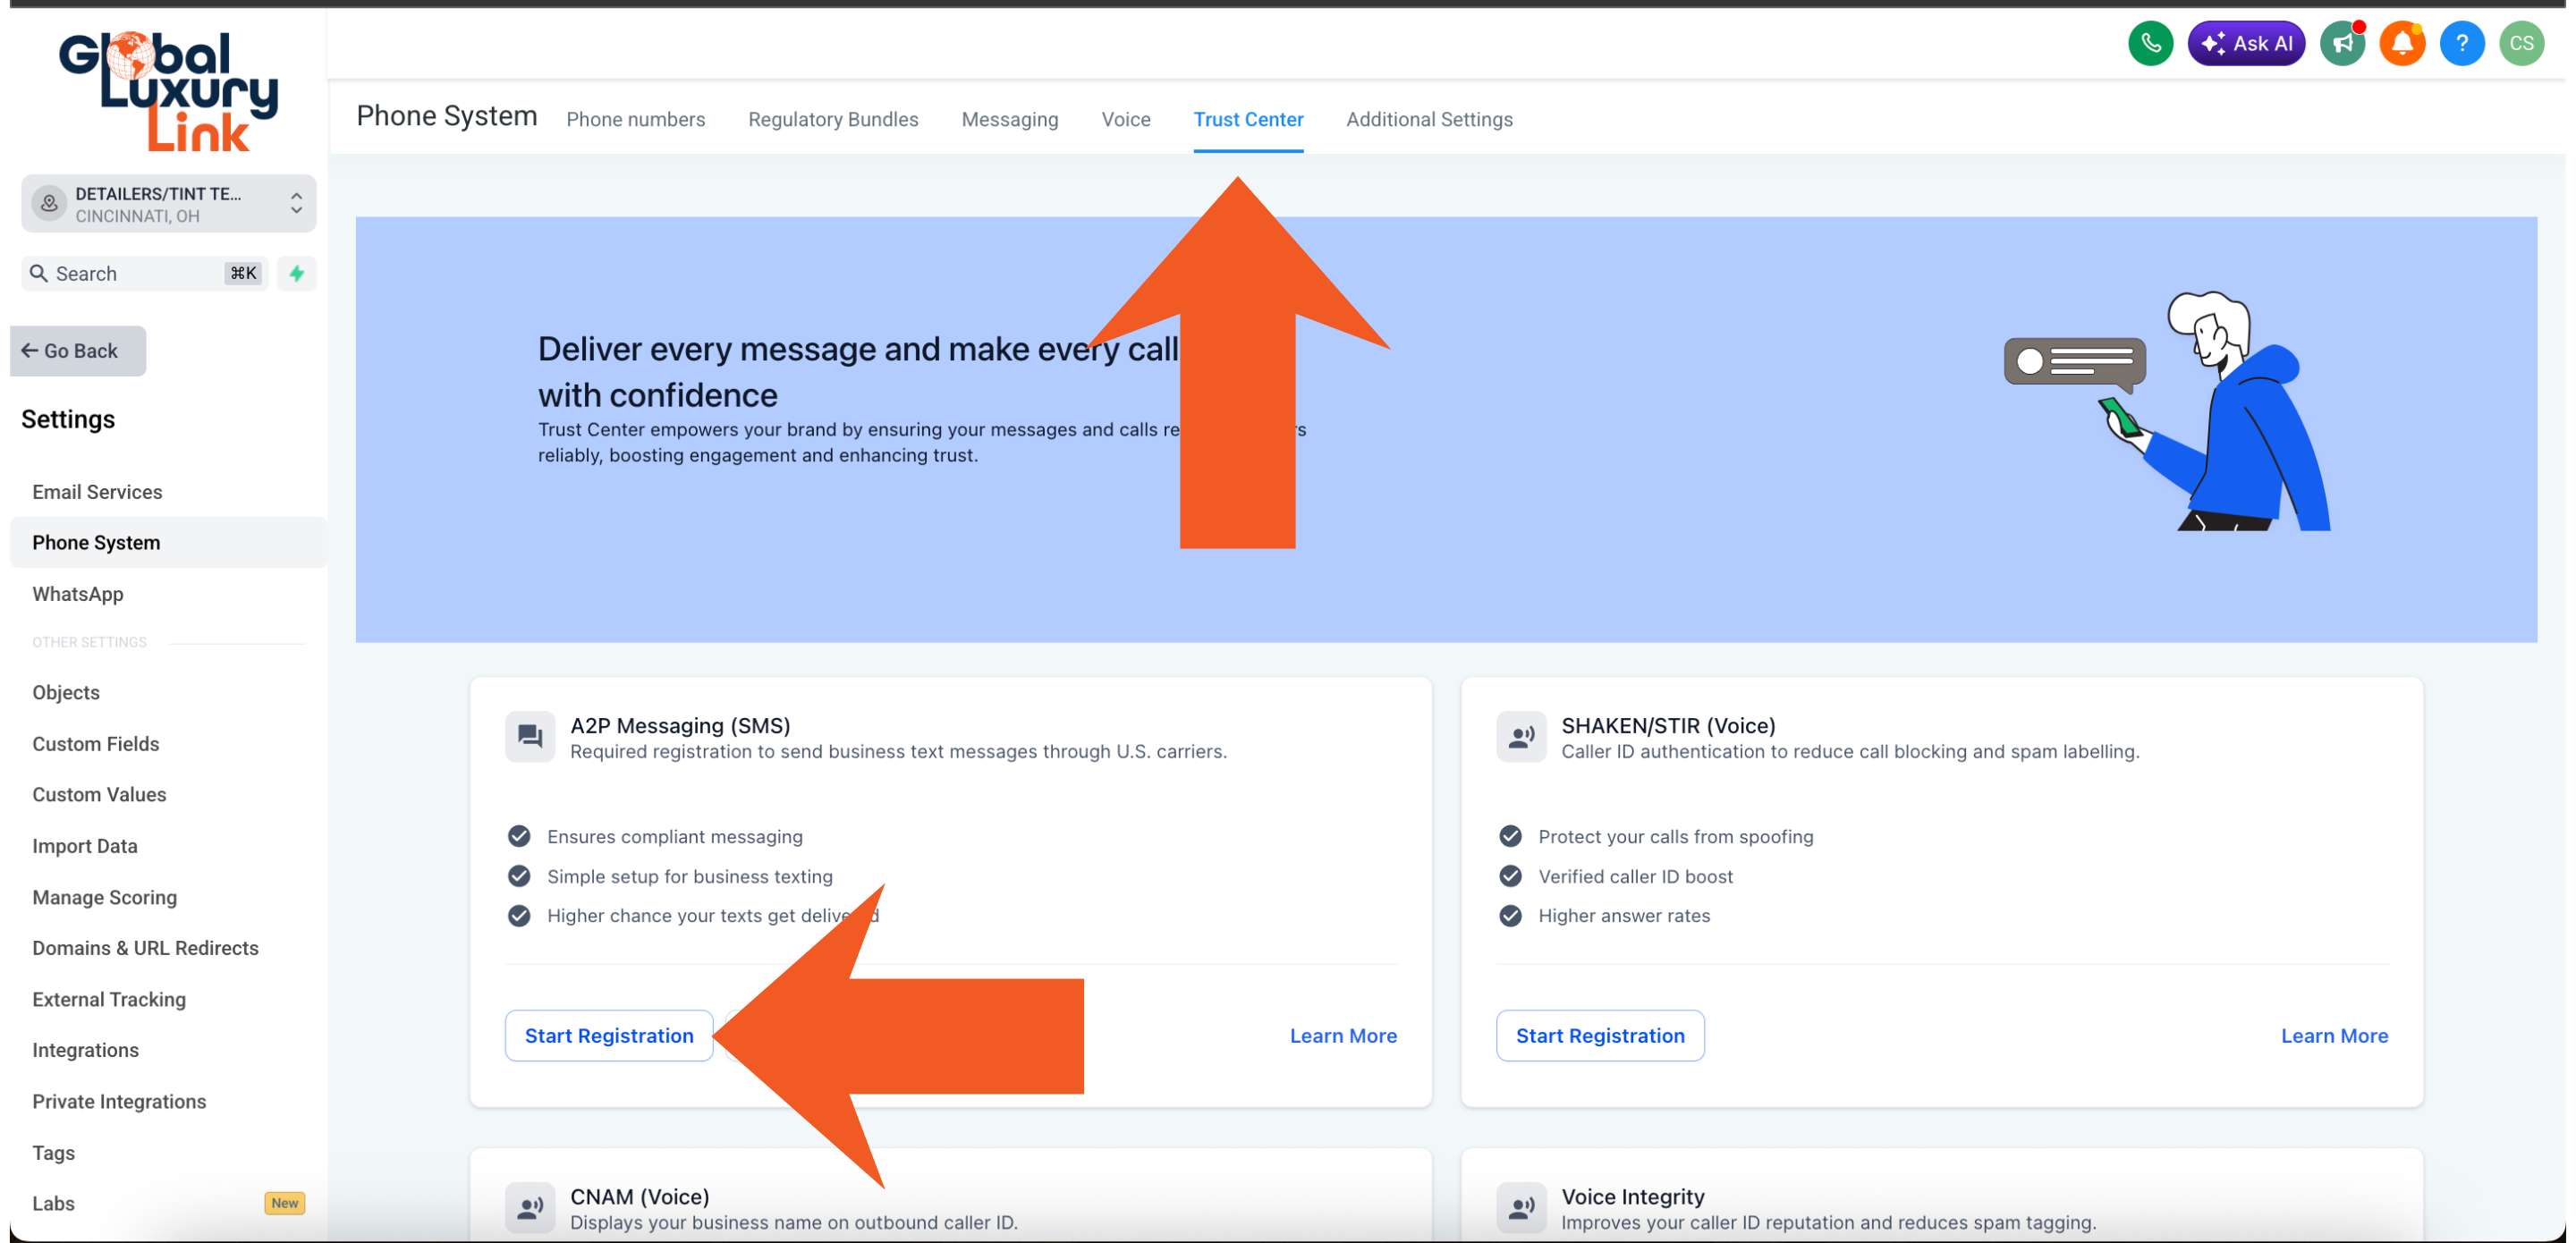
Quick-Approval Tip: Use The Chat Widget Opt-In
Carriers reject most A2P submissions because they can't see a clear opt-in path on the business's website. The fastest way through review is to use the chat widget as your stated opt-in method — and to remove the phone number field from your contact forms entirely.
After You Submit
Automated Review Requests — Deep Dive
Section 10 covered the basics. This section will go much deeper on how review requests actually fire, what you can customize, and how to tie review triggers to paid invoices using the QuickBooks integration.
A dedicated walkthrough video + written deep dive on review automations. This section will include SMS and email copy customization, timing adjustments per service, tying triggers to first paid invoice (via QuickBooks integration for clients using RazorSync or similar), handling low-star feedback privately before it goes public, and adding review-request delays around specific service types.